Amigurumi
The Japanese art of knitting or crocheting small, stuffed yarn creatures.
What is Amigurumi?
Amigurumi (pronounced ah-mee-goo-roo-mee) is the Japanese art of knitting or crocheting small, stuffed yarn creatures. The word is a portmanteau of the Japanese words ami, meaning crocheted or knitted, and nuigurumi, meaning stuffed doll.
While the art form has roots in Japan, it has become a global phenomenon due to its approachable nature and infinite creative possibilities. Unlike traditional garments that require precise sizing, amigurumi focuses on creating tight, 3D shapes.
Essential Tools
To get started with amigurumi, you’ll need a few specialized tools beyond your standard crochet kit:
-
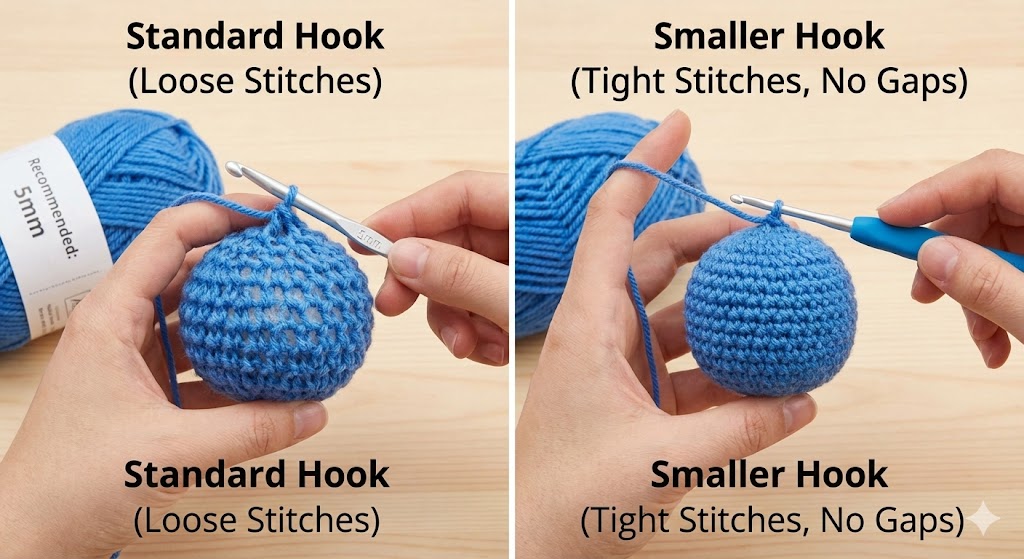
Crochet Hook: For amigurumi, you typically use a hook that is 1-2 sizes smaller than what the yarn label recommends. This ensures tight stitches so the stuffing doesn’t show through.
-
Yarn: Cotton or acrylic yarns are most popular. Cotton provides great stitch definition, while acrylic is affordable and comes in many colors.
-
Stitch Markers: These are crucial! Since amigurumi is usually worked in continuous rounds (spirals), it’s impossible to tell where a round ends without a marker.

-
Stuffing: High-quality polyester fiberfill (Poly-fil) is the standard. It washes well and holds its shape.
-
Safety Eyes: Plastic eyes that snap together (with a washer on the back) to give your creature a polished look. Note: Not recommended for toys given to babies or small children.
-
Yarn Needle: A blunt-tipped needle (often bent) for sewing parts together and weaving in ends.
Working in Rounds
Most amigurumi pieces start with a circle and expand into a 3D shape. There are two primary ways to work in the round:
1. Continuous Spirals (Standard)
In amigurumi, you rarely “join” your rounds with a slip stitch. Instead, you simply work the first stitch of the new round directly into the first stitch of the previous round.
- Pros: No visible seam; the fabric remains perfectly smooth.
- Cons: It’s easy to lose track of where a round starts, making stitch markers absolutely essential.
2. Joined Rounds
Each round is finished with a slip stitch to the first stitch, and a turning chain is made to start the next round.
- Pros: Keeps colors perfectly aligned if doing stripes.
- Cons: Creates a visible vertical “seam” up the side of your work.
The Magic Ring
The Magic Ring (or Magic Circle) is the gold standard for starting amigurumi. It allows you to pull the starting hole completely closed, ensuring no stuffing can leak out of the top of a head or the bottom of a body.
If the Magic Ring is too frustrating, you can “Chain 2 and work 6 sc into the second chain from the hook,” but this often leaves a small hole.
Increases and Decreases
Shaping is what turns a flat circle into a sphere or a limb.
- Increase (inc): Working two stitches into one. This expands the shape.
- Invisible Decrease (inv dec): In standard crochet, a decrease can leave a bump or a small hole. For amigurumi, we use the Invisible Decrease. By working only in the front loops of the next two stitches, the decrease becomes nearly invisible on the outside of the fabric.
Next Steps
Once you have mastered the basic mechanics, you are ready to start building:
- Reading Amigurumi Patterns: Learn how to decode the shorthand syntax like
[2 sc, inc] x 6. - Amigurumi Assembly: The final polish comes from proper stuffing, sewing, and facial detailing.