Advanced Techniques Intermediate
Granny Squares
A classic crochet technique where square motifs are worked from the center outward, typically using groups of double crochet stitches separated by chains.
Granny squares are one of the most iconic and versatile elements of crochet. They can be joined together to create blankets, sweaters, bags, and more.
The Anatomy of a Square
Understanding the structure is key to mastering the granny square:
- The Center: Everything starts from a central ring. This can be formed using a Magic Ring (for a tight center) or by chaining 4 and slip stitching to the first chain (for a more open, traditional look).
- Clusters (Shells): The building blocks of the square. A “cluster” is typically a group of 3 double crochet (dc) stitches worked into the same space (either the center ring or a chain space from the previous round).
- Chain Spaces: These create the gaps between clusters where you will work into on the next round.
- Side Spaces: Usually ch 1.
- Corner Spaces: Usually ch 2 or ch 3 to allow the fabric to turn 90 degrees without curling.
Basic Pattern (Classic Granny)
Here is a text-based walkthrough of a traditional square:
- Round 1: Start with a magic ring. Ch 3 (counts as first dc), 2 dc in ring, ch 2. 3 dc in ring, ch 2. Repeat from * to * 2 more times. Join with sl st to top of starting ch-3. (4 clusters, 4 corner spaces).
- Round 2: Sl st over to the first corner space. Ch 3, 2 dc in same space, ch 2, 3 dc in same space (first corner made). Ch 1, skip next cluster, [3 dc, ch 2, 3 dc] in next corner space. Repeat around. Join.
- Round 3+: Work 3 dc in every side space (ch-1 sp) and [3 dc, ch 2, 3 dc] in every corner space. Separate groups with ch 1.
Variations & Creativity
While the “Classic Granny” is the most common, there are hundreds of variations:
- Solid Granny Squares: Uses dc stitches across the sides with no chain gaps, creating a denser, warmer fabric suitable for winter blankets.
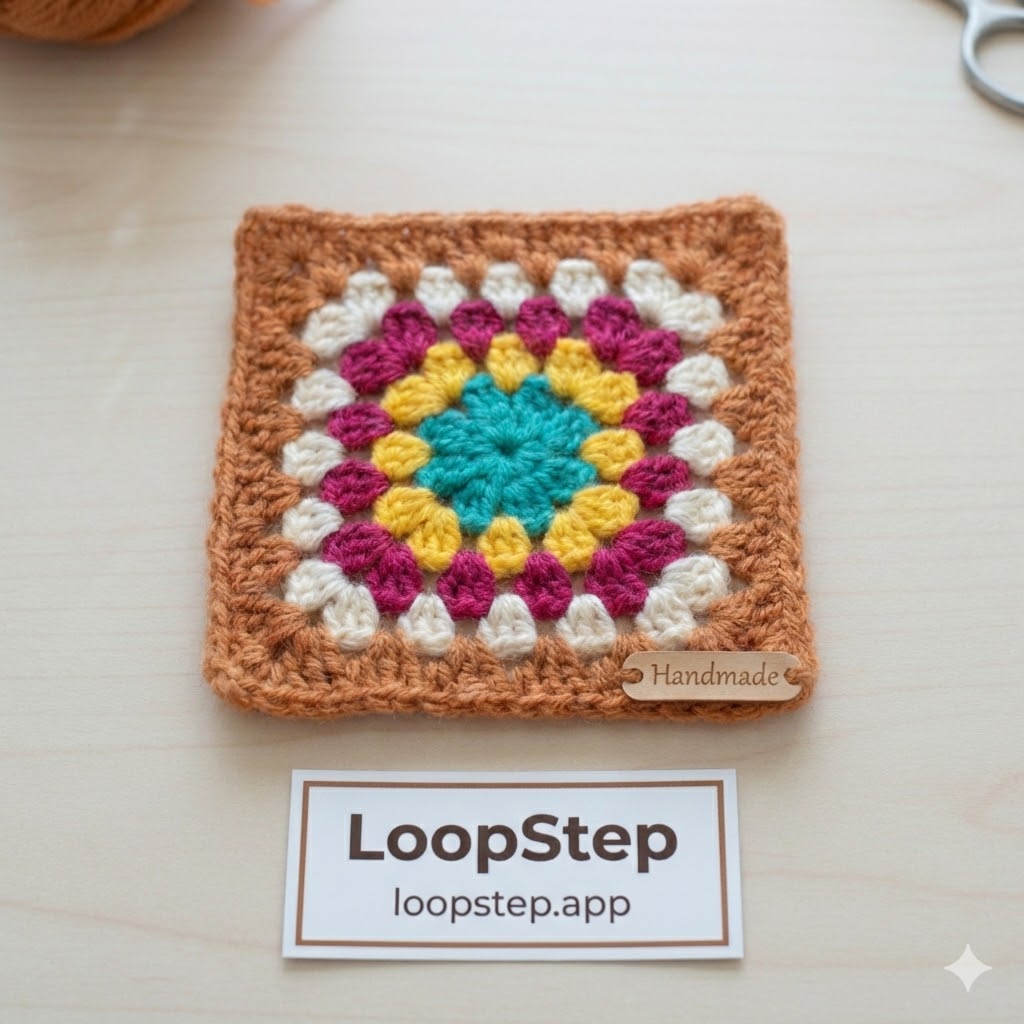
- Sunburst/Flower Squares: Begins with a circular flower motif (using puff or popcorn stitches) that is “squared off” in the final rounds using stitches of varying heights (sc, hdc, dc, tr) to create corners.
- Target Squares: Changing colors every round to create concentric circles or squares.
Color Theory
Granny squares are perfect for stash-busting (using up leftover yarn).
- Random/Scrappy: Use a different color for every round. Great for a boho look.
- Unified: Use different colors for the centers but join them all with a uniform border color (e.g., black or white) to make the colors pop and create cohesion.
- Gradient: Use shades of the same color (e.g., light blue to dark blue) for an ombré effect.
Blocking
Because granny squares are worked in rounds, they often come out slightly rounded or lopsided. Blocking is essential:
- Pin the square to a foam board or blocking mat, stretching it to the desired dimensions.
- Spray with water (or steam, depending on fiber).
- Let dry completely. This “sets” the square shape, making joining much easier and the final project flatter.
Troubleshooting
- Why is my square a circle? You might not be putting enough chain stitches in your corners, or you might be missing the corners entirely. Remember: Corners usually need two clusters separated by chains.
- Why is it twisting? If you work strictly in rounds (always facing the front), the natural slant of crochet stitches can cause a “swirl” effect. To fix this, turn your work after every round, just like you would when working in rows. This balances the tension.